Travel router with automatic IPVanish VPN connection
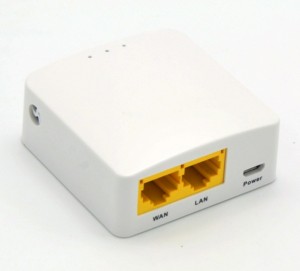 GL-iNet AR150 Travel Router
Recently is bought a little mini router/firewall/accesspoint (Travel Router) on dealextreme.com. I was looking for a simular device as the TP-Link WR703N, wich I already own.
I found this little device called the GL.Inet GL-AR150. The device has 2 ethernet ports, WAN and LAN (both PoE) and there is a Atheros 9331 (same as WiFi Pineapple Mark V) WiFi chipset on board. So I ordered and yesterday received it by mail. After updating the firmware to OpenWrt Designated Driver r48135 / LuCI (git-16.004.80366-03a8393 we can start!
What’s my PoC
I want a device that I can use in hotel rooms, public hotspots and maybe also with customers on the job to secure my own devices/traffic true a VPN service.
I’m using IPVanish as IP VPN provider, but sometimes I forget to connect the IP VPN and using the local internet provider for all my connections.
So, I needed a device that automaticly connects my devices via IP VPN. Let’s go!

There are 2 setup possibilities:
- Connect WiFi from GL.Inet to existing WiFi Hotspot
- Connect WAN port to local network (for example at customer)
Setup VPN
Now we need to install the OpenVPN client and configure it. The VPN termination point is going to be one of IPVanish servers, but it could be any OpenVPN server.
First step, we’ll need to install a couple of packages on the router: openvpn-openssl for obvious reasons, wget to downlad the configuration files from IPVanish site, and unzip to unzip the downloaded files.
The easiest way is done by connecting through SSH (PuTTy) and running the commands below.
opkg update
opkg install openvpn-openssl
wget unzip
mv /etc/config/openvpn /etc/config/openvpn_old
Unfortunately, there is no LuCI package for OpenVPN (webbassed configuration). This means everything has to be done from the command line.
Let’s create the new interface for the VPN (Named IPV because i’m using IPVanish).
cat >> /etc/config/network << EOF
config interface 'IPV_VPN'
option proto 'none'
option ifname 'tun0'
EOF
Next step is to download the OpenVPN configuration files from IPVanish.
Go to /etc/openvpn

wget --no-check-certificate <a href="https://www.ipvanish.com/software/configs/configs.zip">https://www.ipvanish.com/software/configs/configs.zip</a>

unzip configs.zip
rm configs.zip
For simplifying the usage we’ll need to create a authentication file containing our username and password.
cat >> /etc/openvpn/authuser << EOF
IPVANISH_USERNAME
IPVANISH_PASSWORD
EOF
However, now we’ll have to go back and edit each .ovpn file to look for the authuser file, which is too much work. So let’s create a new fresh configuration file.
Create the file with the command below. we’ve added a line for the authuser file.
cat >> /etc/openvpn/ipvanish_gen.ovpn << EOF
client

dev tun

proto udp

resolv-retry infinite

nobind

persist-key

persist-tun

persist-remote-ip

ca ca.ipvanish.com.crt

auth-user-pass authuser

comp-lzo

verb 3

auth SHA256

cipher AES-256-CBC

keysize 256

tls-cipher DHE-RSA-AES256-SHA:DHE-DSS-AES256-SHA:AES256-SHA

EOF
Now, we need to create a new firewall zone for this VPN connection. This is actually the same config as the WAN zone, but it’s easier to make a new zone in case we need to change anything in the future. Name the firewall zone, and substitute the network interface name you created above. We’ll also be forwarding LAN traffic to the VPN.
cat >> /etc/config/firewall << EOF
config zone
option name 'VPN_FW'
option input 'REJECT'
option output 'ACCEPT'
option forward 'REJECT'
option masq '1'
option mtu_fix '1'
option network 'IPV_VPN'

config forwarding
option dest 'VPN_FW'
option src 'lan'
EOF
Reboot your router. You can login to LuCI and see the new network interface, physical (but really, it’s virtual) interface, and firewall zone. Back on the command line, use the following command to start the VPN. Specify your generic configuration file, and choose a server from the downloaded files from IPVanish.
openvpn --cd /etc/openvpn/ --config /etc/openvpn/ipvanish_gen.ovpn --remote zur-c01.ipvanish.com 443
If everything went well, you should see something like below, ending in Initialization Sequence Completed. If not, you did something wrong. Check your logs and start looking here.
Check ifconfig to see if you have a tunnel interface. If you do, that’s good!
tun1     Link encap:UNSPEC HWaddr 00-00-00-00-00-00-00-00-00-00-00-00-00-00-00-00

inet addr:172.20.19.104 P-t-P:172.20.19.104 Mask:255.255.252.0

UP POINTOPOINT RUNNING NOARP MULTICAST MTU:1500 Metric:1

RX packets:0 errors:0 dropped:0 overruns:0 frame:0

TX packets:0 errors:0 dropped:0 overruns:0 carrier:0

collisions:0 txqueuelen:100

RX bytes:0 (0.0 B) TX bytes:0 (0.0 B)
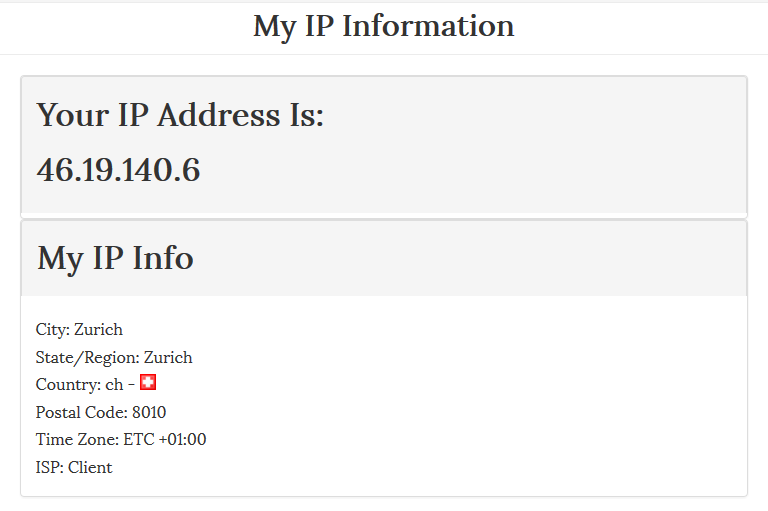
Next, try to get on the internet. If you can’t, there’s a good chance it’s a DNS issue. To resolve this, you’ll have to look at your DNS servers on the LAN interface.
Check your IP with an external tool, like WhatIsMyIP, both on your local wireless network, as well as the OpenWrt network. You should see the difference, meaning you are successfully connected!
Running IP VPN at standard at startup on Travel Router
If you’d like your VPN connection to run at startup, login to the web-interface go to the System dropdown, then select Startup. In the box at the bottom, paste the following command before exit 0. The ampersand tells OpenWrt not to output anything to the screen.
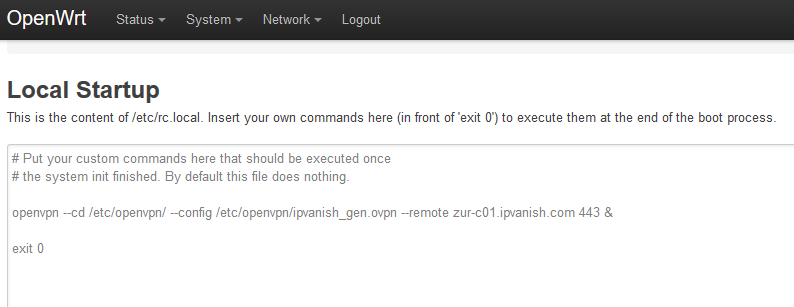
openvpn --cd /etc/openvpn/ --config /etc/openvpn/ipvanish_gen.ovpn --remote zur-c01.ipvanish.com 443 &
Enjoy your Travel Router!